


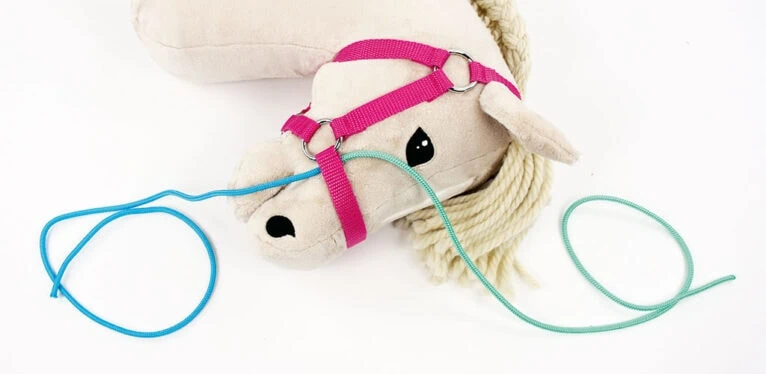
Braiding the noseband is an easy way to customize your Hobby Horse head collar and add a pop of color. With just a bit of rope and a simple knotting technique, you can turn a plain webbing noseband into a decorative detail – and the same method can also be used on other straps of the halter, such as the cheek straps!


If you don’t know how to make a Hobby Horse halter yet, don’t worry! We also have a step-by-step tutorial that shows you how to make a halter from bag webbing or ribbon before adding the braided noseband!
Braid the noseband or any strap of a halter: video tutorial
Check out this video from minute 5:37 on our kullaloo Youtube channel to see how to braid the noseband of a Hobby Horse rope halter:
🧵 Materials you’ll need:
- Rope, like PP or paracord, with a diameter of about 5⁄32″ (4 mm), 2 colors of approx.
27″ (70 cm) each OR 1 color of 54″ (140 cm)
Polypropylene rope (PP) works especially well as the ends can be sealed with heat. If your rope is made from a different material, you can secure the ends by sewing or gluing.
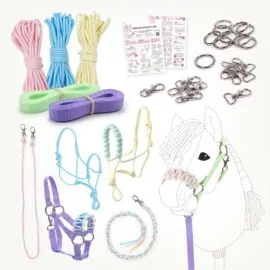
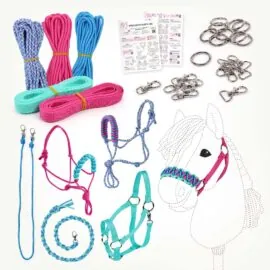
We offer several halter DIY kits that include all the materials you need to make halters with a braided noseband, each including three different PP ropes plus bag webbing for stable halters and hardware like snap hooks.
-
-18%

Hobby Horse Halter DIY Kit – Make a hobby horse Halters with Leads | Pastel
Original price was: USD $36.50.USD $29.90Current price is: USD $29.90. Add to cart -
-18%
Hobby Horse Halter & lead rope DIY Kit | Purple & Pink
Original price was: USD $36.50.USD $29.90Current price is: USD $29.90. Add to cart -
-18%
Hobby Horse Halter DIY Kit – Make Halters & Leads | Aqua & Pink
Original price was: USD $36.50.USD $29.90Current price is: USD $29.90. Add to cart

How to make a braid a strap of a Hobby Horse head collar
1. Prepare the rope
If you’re using two colors, connect the two rope pieces first so you end up with one long rope about 54″ (140 cm) in total. With polypropylene rope, the ends can be carefully melted with a lighter and pressed together. If you’re using another material, you can sew the ends together by hand or glue them instead.


If you’re using only one color, mark the center of the rope with a pin. This helps you position the rope correctly under the noseband.
2. Position the rope
To make the starting point easier, it helps to leave the halter on the Hobby Horse for the first steps. Pull the rope under the noseband so that the center of the rope sits directly underneath the webbing, as close to the O-ring as possible. Make sure the joined or marked center stays hidden on the back of the noseband.
3. Braid
Lay both rope ends away from the noseband. Form a loop with the left rope and guide it over the noseband to the other side. Then take the right rope, guide it over the left rope, under the noseband, and out through the loop. Pull both ropes gently to tighten the knot. This creates the first knot of the braid. Make sure the center of the rope stays hidden underneath the noseband.


For the next knot, repeat the same steps, forming the loop with the same rope color that is now on the opposite side. Always form the loop with the same color, alternating sides along the noseband.


Continue braiding in this way until you reach the other end of the noseband. You’ll see the pattern forming very quickly. Once you’re comfortable with the technique, you can remove the halter from the horse and continue braiding off the horse if you prefer.

3. Finish the braid
When the entire noseband is braided, turn it over so you’re looking at the back of the webbing. Shorten the first rope end so it ends roughly in the middle of the back of the noseband. Seal the end and secure it to the webbing. With polypropylene rope, this can be done by slightly melting the rope and pressing it onto the webbing, or by using glue.


Repeat the same step with the second rope end so both ends meet neatly at the back. For extra security, you can add a few hand stitches or reinforce the ends with glue.


That’s it, your Hobby Horse head collar is finished!
And the good thing is: this braiding technique isn’t limited to the noseband. You can use the same method to braid other parts of the halter as well, such as the cheek straps, to create a coordinated look.
Looking for more hobby horse DIY ideas? You can find many more tutorials to customize and upgrade your Hobby Horse, from making matching lead ropes and reins to crafting rope halters with braided nosebands. All tutorials are designed to work together, so you can mix and match materials and techniques to create a complete set for your stick pony.